Sleep Better with This Natural Remedy

Wellness

Spend any amount of time with me and you will quickly realize one thing: I can’t sit still. Twenty five years into my life and I’m still learning the concept of “relax.” Whether it’s cooking, cleaning, working, making art, playing with the dog, learning a new piece on the piano, reading, writing, etc., etc., etc., I always have to be doing something. Always. Hence the name of this blog! I just can’t help myself.

Usually, this is a good thing. I’m never bored and I’ve truly mastered how to prioritize my to-do list to make sure I have time for everything I want (and need) to do.

Like everything else though, being busy also has its downside. Because I’m always on the go, I have a really reeeeally difficult time unwinding to go to bed at night. Aside from having my energy levels up all day, I also struggle to shut my mind down – so many things to do tomorrow!

Point of the story: I’m not good at relaxing. BUT it’s something I’ve been working on. In fact, one of my resolutions for 2019 is to get more sleep (5.5 hours a night just isn’t cutting it anymore) and so far, there’s been one important thing that has been helping me accomplish my goal: lavender essential oil.

I was first introduced to all the benefits and uses of lavender by my in-laws, who are in the process of growing their new lavender farm. Some of the benefits of using lavender essential oil include:

  • Reduced anxiety
  • Better sleep quality
  • Headache relief

I decided to work this miracle plant into my bedtime routine and for the past few weeks, have been using this diffuser, purchased on Amazon, to diffuse lavender essential oil in my bedroom before going to sleep.

The scent is heavenly and it definitely helps me relax before shutting down for the night. ✨

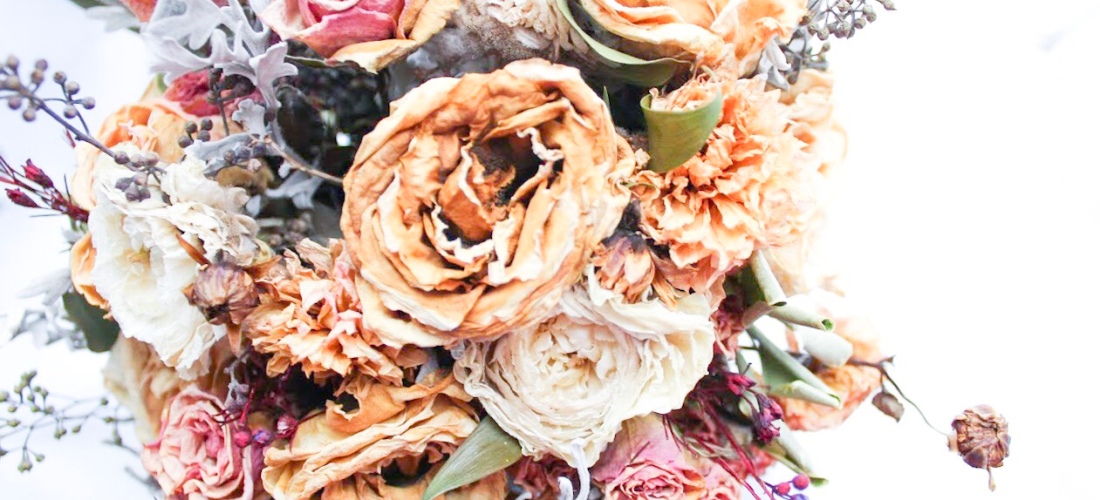
If you’re looking for a more powerful dosage, you can also apply essential oil directly to your pillow, either through drops or by leaving some dried sprigs on your pillowcase a few hours before going to bed.

So far, I’m loving incorporating lavender into my bedtime routine – it really does help me relax! Not to mention it smells amazing. 🤗 I’ve even started placing dried lavender bunches throughout my house for scent and pops of color.

To learn more about drying florals, click here. 🥀 And to learn more about Hillcrest Lavender Farm, click here.

The Easiest Way to Preserve Fresh Flowers

DIY

One of the things I loved most about my wedding was the flowers, especially my bouquet. 💐 I had gone through two consultations with my florist prior to the wedding but, admittedly, was having a difficult time imagining what the finished product would look like.

I had brought several inspiration photos to the first meeting and was dismayed to learn that most of my desired florals weren’t in season. My florist assured me that her suggested alternatives would be just as a beautiful and, leaving it to the professional, I trusted all of her suggestions.

I remember getting ready the morning of the wedding, somewhat frantically running around doing 8 million things but stopped dead when the flowers were delivered. They were gorgeous – prettier than I could have ever imagined.

Janitz bridal portraits-2.jpg

And my bouquet? Breathtaking. Leading up to the wedding, I definitely questioned my own vision from time to time (totally normal for brides) but felt so happy with all of my decisions when I saw that bouquet. It was the proverbial icing on top. Holding that bouquet made me feel like a bride.

Janitz bridal portraits-10.jpg

After the wedding, Andy and I immediately started getting ready for our honeymoon to Maui and Kauai. I was incredibly excited for our trip, but kept thinking how sad it was that all of my flowers would die while we were away.

I was on a mission to preserve some of these pieces and made a special trip to my florist’s shop before embarking on our honeymoon. After talking it through with her, she provided me with a simple solution to preserve my flowers for many years to come. She even showed me her own preserved flowers from her son’s wedding – over 20 years ago!

Following her advice, this is what I did to preserve my wedding bouquet & Andy’s boutonniere (and spare boutonniere – which, by the way, is an excellent low-budget add that is totally worth having in your floral proposal should anything go awry).

Step 1

If preserving multiple flowers, tie the stems together tightly with string.

Step 2

Spray flowers lightly with hairspray.

Step 3

Hang flowers upside down in a cool, dark place away from direct sunlight. Closets are perfect!

Step 4

Allow them to dry for a week or two.

Step 5

Once dried, feel free to give them another dose of hairspray.

Step 6

Take them down and enjoy them forever!

I’ll admit, I’m super excited about how our florals turned out and have been enjoying displaying them in our home. They are a great every-day reminder of how perfect our wedding was and how exciting our life together is bound to be.

Wedding photography: Blushwood Studios
Floral designer: The Floral Fantasy
Wedding gown: Circa Bridal Boutique
Hair & makeup: Dayna Rae Beauty

Fudgey Chocolate Cut-out Cookies 💞🍫

Food

Chocolate cut-outs are admittedly delicious any time of year, but they are extra fun around Valentine’s Day! I made a batch of these decadent cookies this year to give away to my co-workers and family members, and left a few for my husband, of course. 😘

The dough whips up super fast and you can even make it a few days in advance. If you choose to do so, just be sure to wrap the dough in plastic wrap tightly to prevent air from getting in and drying it out.

While I’m writing this post for Valentine’s Day, I encourage you to get creative and use this recipe all year round. I love my Wilton cookie cutter set because it allows me to make cookies for literally any occasion.

Christmas, Saint Patrick’s Day, dinosaur day…no wait, that’s not a thing. But it very well could be!

Side note: this recipe produces quite a few cookies so be prepared to be a crowd pleaser!

Ingredients

  • 3 cups all-purpose flour, plus more for counter
  • 2/3 cups unsweetened cocoa
  • 3/4 teaspoon table salt
  • 1/2 teaspoon baking powder
  • 16 tablespoons (2 sticks) unsalted butter, softened
  • 1  1/2 cups sugar
  • 2 large eggs
  • 1 teaspoon vanilla extract
  • 1 cup white chocolate melting wafers (I used Ghirardelli)

Instructions 

  1. Preheat oven to 350F.
  2. Whisk flour, cocoa, salt, and baking powder together in a medium sized bowl and set aside.
  3. Beat butter and sugar with an electric mixer until fluffy. Add eggs, one at a time, scraping down side of bowl. Mix in vanilla.
  4. Gradually mix the dry ingredients.
  5. Wrap dough in plastic wrap and chill for at least 1 hour.
  6. Roll out the cookie dough on a floured counter to about 1/4 inch thickness.  Cut dough into heart shapes.
  7. Bake on a parchment lined baking sheet for about 7-8 minutes. The edges should be firm and the centers are slightly sod and puffed.
  8. Transfer to wire rack to cool.
  9. Once cooled, melt your white chocolate according to the instructions on the package. Use a fork to drizzle the melted chocolate onto the cookies.
  10. Enjoy! 😍

Original recipe retrieved from Shutterbean.

Valentine’s Day Red Velvet Crinkle Cookies

Food

I love Valentine’s Day! It’s a great reminder for all of us to take the time out of our day-to-day to show appreciation for those we love most.

Valentine’s Day also means a plentiful amount of one of my favorite things: Chocolate! While I’m always down for a box of assorted truffles, I love using the holiday as an excuse to bake up some delicious homemade goodies.

This V-day I decided to bake up these extra-festive red velvet crinkle cookies. Because of their mild flavor these cookies are perfect for choco-holics and vanilla-lovers alike.

Ingredients

2 c. all-purpose flour
2 tbsp. unsweetened cocoa powder
1 & 1/4 tsp. baking powder
1/4 tsp. baking soda
1/2 tsp. kosher salt
1 stick of salted butter
3/4 c. granulated sugar
large eggs
2 tsp. pure vanilla extract
1 tbsp. red food coloring (Tip: use gel food coloring for more vibrant color!)
1/4 c. powdered sugar

Instructions

  1. Preheat oven to 350° Fahrenheit and line 2 baking sheets with parchment paper.
  2. In a medium bowl, whisk together flour, cocoa powder, baking powder, baking soda and salt.
  3. In another large bowl, beat butter and sugar together until light and fluffy. Add eggs, one at a time and beat after each addition. Add vanilla.
  4. Gradually add dry ingredients to the wet ingredients and mix until just combined.
  5. Roll about 1 tablespoon of dough into a ball, then roll ball in powdered sugar. Repeat with remaining dough then reroll each ball in powdered sugar again.
  6. Arrange balls about 1″ apart on prepared baking sheets and bake until cookies have flattened and set in the middle, 10 to 12 minutes
  7. Let cool on trays 5 minutes, then transfer to wire rack to let cool completely.

Bake up a batch of these to share with your loved one, your parents, your co-workers, or your friends!

Original recipe retrieved from Delish

Weaving buffalo check on the rigid heddle loom

Art, DIY

Screen Shot 2019-02-11 at 6.01.09 PM.png
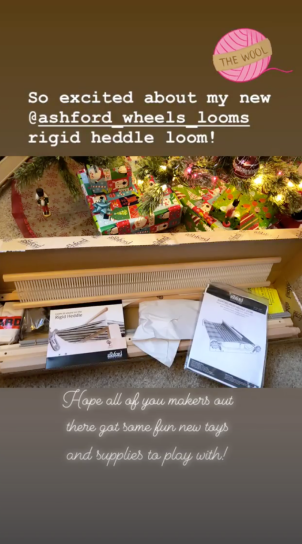
This Christmas my husband gifted me perhaps the greatest present you could ever buy a fiber artist: an Ashford rigid heddle loom! I took a couple of weaving courses in college and have really been missing the art form over the past few years.

While I am knowledgable in weaving on a floor loom, the rigid heddle is a new venture for me. Things that I’m loving about it so far:

  1. It’s so light! I can move it wherever I want.
  2. It doesn’t take up a lot of space. Slide it right under the bed if you want!
  3. Warping it is a breeze. Less than an hour? Yes, please.
  4. It allows me to use a wide variety of yarns. Suddenly yarn scraps have a purpose again!

Hands down, an awesome option for beginner weavers as well as those who may not have the room to dedicate to a floor loom or the money to invest in one.

My new loom is the 32” model which is amazing because it allows for me to create patterns up to that width but also as narrow as I would like. This means I can make blankets as well as scarves!

Because the rigid heddle loom is new to me, I’ve been using the last six weeks as a learning period – experimenting with different yarn weights, colors and patterns.

So far, one of my favorite designs is buffalo check. This trendy pattern is honestly the simplest you could create on the rigid heddle loom and, when created with contrasting colors, yields striking results.

Pattern

Warp: 4 red, 4 blue (8 ends)

Weave: 4 red, 4 blue

I followed this pattern using Caron Simply Soft yarn in red and navy to create this super cozy scarf.

Seriously, so simple! I’m curious, what are your favorite buffalo check colors?

Stay tuned for more pattern exploration updates and don’t forget to follow along with my weaving adventures on Instagram.


DIY Plaid Flannel Blanket Scarves

DIY

This Christmas I was inspired to go all-out with homemade holiday gifts. In searching for a project I could tackle for several of my family members, I came across a great DIY gift idea: blanket scarves!

Trendy and inexpensive to make (less than $10 per scarf), I decided to give this craft a whirl this holiday season, making one for every female family member I’d be spending time with on Christmas day.

This ended up being nine scarves. Word to the wise, if you’re planning to make this many scarves for Christmas start early (like, early November) to avoid stressing yourself out with a scarf-making frenzy two days before Christmas. Yes, I’m speaking from experience.  

That being said, these scarves would make great gifts any time of year!

The time and energy were well worth it, as these homemade gifts were a huge hit. Now that the holidays are over I’m looking forward to making one for myself!  

Supplies:

  • 1.5 yards of apparel flannel (can be found at Walmart & Joanne Fabrics)
  • Scissors
  • Seam ripper

Instructions

  1. Start by trimming all edges, using the plaid pattern as a guideline to cut relatively straight. Don’t worry if you mess up! The fresh cut will make it easier for you to begin pulling your fringe.

2. Fold the fabric diagonally, creating a right angle.

img_3996.jpg

3. Trim the long end of the fabric so that it lines up with the edge to form a square.

4. Now – get a movie ready as you begin to start your fringe. This part of the process is easy – it just takes a hot second. Here’s what you’re gonna do – using the seam ripper, begin to undo the weave of the fabric, thread by thread. (check out the photo below)

5. You can either create a fringe on two sides of your scarf OR all the way around. Personally, I like blanket scarves that have a little fringe on all sides.

6. Once you’re done with the fringe you can either stop as is or (for extra reinforcement) use a sewing machine to run a quick stitch down all four sides.

Once your done with the fringe, all that’s left is to package it up pretty to give away as a gift! Or, ya know, throw it around your neck and call it yours. 😏


Snowy Pine Embroidery

Art, DIY

This Christmas I went all out in making handmade gifts. In fact, I spent most of November and December unweaving flannel for homemade blanket scarves for all the girls in my family – more on that later.

Aside from the scarves, I also gifted both sets of my parents and grandparents an original hand embroidery.

I decided to do a different design for each couple and the design I’m sharing today is the one I completed for my grandparents.

This design features three snow-covered pines, standing elegantly in a winter wonderland. I was inspired by winter-themed embroidery art I found on Pinterest, and was particularly drawn to this idea as my grandparents can now display this artwork all winter, instead of having to take it down with the Christmas decor.

I would highly recommend a design like this for artists looking to get into fiber art. With its limited color palette and simple line-art design, it’s a very approachable piece. In fact, it only took me a few hours to complete!

If you’re interested in tackling a pine-inspired embroidery, check out some inspiration here.

Happy stitching!


Celebrating the magic of Christmas with a Nutcracker embroidery

Art, Holiday

There is undeniably something magical about Christmas and the season that surrounds it. Sparkling snow, sweet treats, cheerful music and smiles on even the most sullen faces. Truly, it’s the most wonderful time of the year.

One story I always found to capture Christmas magic in its own whimsical way is “The Nutcracker.” If you’re up to date with my holiday posts then you know I love incorporating these mystical wooden figures into my work this time of year, usually through drawings.

Last year, I decided to embark on a bigger undertaking: a nutcracker hand embroidery. Measuring nearly nine inches tall and having started the project in early December, I wasn’t able to complete the embroidery for last Christmas – there was a lot of baking and wrapping to be done, after all – and has been tucked away for the past year.

Having finally wrapped up most of my DIY gifts for the holidays (more to come on these later) I decided to pull this little German guy out this weekend and work to get him done for this Christmas.

Finally finished with this massive embroidery undertaking, I’m through the moon excited with how it turned out.

This slideshow requires JavaScript.

I can’t wait to display him my house for many Christmases to come! And who knows, maybe every year will be marked with a unique nutcracker piece – but only if I start the piece immediately following Halloween!

Christmas checklist: Inspiration for getting into the Christmas spirit

Holiday

With Christmas less than two weeks away, there’s no better time to inspire yourself and get into the holiday spirit! For everyone who may be feeling a little grinchy this Christmas, here are a few tips and ideas to help you channel your inner Buddy the Elf:

Stir up a Christmas cocktail

Nothing says happy holidays like a stiff, spiced drink! Click here to read more about my favorite Christmas cocktail.

img_3825

Turn up the tunes

Listening to Christmas music is a sure-fire way to inspire holiday joy. I love listening to it while I’m working on projects in the studio. Bing Crosby on repeat, please.

IMG_3776

Get your DIY on

Make a homemade ornament or gift! Words can’t describe how fullfilling it is to make something with your own two hands. And it only gets better when you give homemade goodies away to loved ones.

img_0052

During this time of year, I also love making wreaths. Check out my tutorial here!

IMG_3814.jpg

Turn the oven on and open the spice drawer!

Nothing makes me happier during the holidays than baking, especially cookies. This year my family started a new tradition: Christmas cookie baking day! Everyone brought two doughs with them and we spent the afternoon baking and sharing laughs over Christmas cocktails and record music.

Set up your own Christmas cookie baking day! Make up some gingerbread dough, invite your friends over and spend time cutting them out and decorating together. Pour some eggnog (or wine) and enjoy making memories.

img_3937

Practice gratitude

Get away from the commercialism by taking a moment to remind yourself of all you have to be grateful for – there is no better time than Christmas! This year I am especially grateful, celebrating my first married year with Andy, and in our new house none the less!

It truly is a wonderful life.

Only 12 days until Christmas!